
Who is this for?
👤 Admins
👁️🗨️ Available for all plans
In this article
Create and manage custom roles
Roles in Showell
Everyone in your Workspace has their own user account, and each account is given a Role that decides what they can access and manage. There are three roles:
- Admin: full access to all features and settings.
- Member: basic access to features. This is the default role for new users.
- Custom: a role you build yourself, to give a user more (or less) than a Member without making them a full Admin. See "Create and manage custom roles" below.
➡️ We highly recommend first reading A Guide to Roles, Groups and Privileges to fully understand how roles and privileges work together before you set up custom roles.
How to change a user's role
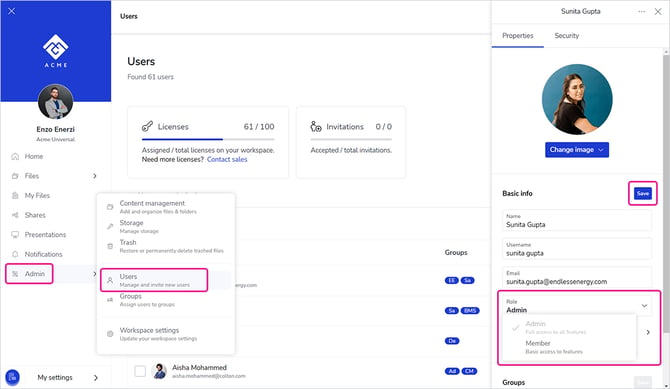
- In the Showell App for Web side menu, click Admin > Users
- Find and click the user you'd like to adjust the role
- Open the Role dropdown and choose Admin, Member, or a custom role. The change is saved right away.
Create and manage custom roles
Custom roles let you define a reusable set of permissions once and assign it to any user. Use them when Member is too limited but full Admin is too much: for example an analytics and notifications manager, a content-only or LMS-only admin, or a user whose My Files is restricted.
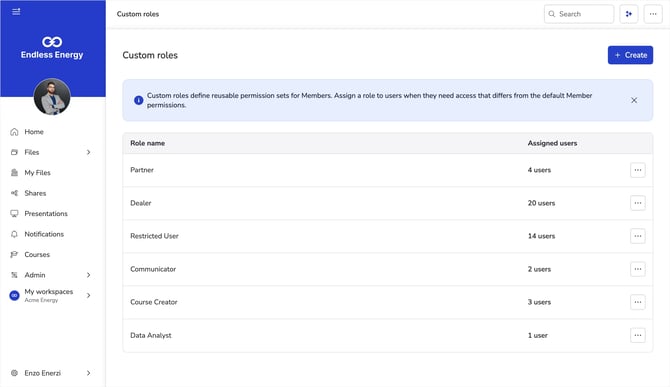
Create a custom role
- Go to Admin > Custom Roles.
- Click Create.
- Enter a Role name. It must be unique within your Workspace.
- Choose a Role template, either Member or an existing custom role, to prefill the permissions.
- Under Permissions, set each permission/capability to the access level you want
- Click Create.
Edit or remove a custom role
In Admin > Custom Roles, each role is listed with the number of users assigned to it. Open the '3dots' menu next to a role to Edit its permissions or Remove it.
- You can only remove a custom role once no users are assigned to it. Move its users to another role first: open that other role in Admin > Custom Roles and add them from its user list.
Assign a custom role
- Existing users: open the user in Admin > Users and pick the custom role from the Role dropdown, as described above.
- Many users at once: go to Admin > Custom Roles, open the role and add users from its user list. You can select several users in one go.
- Automatically with SSO: Showell can give users a role based on their SSO group. If the role is set to update at every sign-in, a role you assign by hand is replaced at the user’s next sign-in. See Single Sign-On (SSO): Setup Guide.
- While inviting new users: choose the custom role from the Invite as dropdown when you invite people.
- Assigned roles are included when you export your users.
Custom Role: Permissions
When you create a custom role, you set an access level for each capability. A quick way to think about it:
- For most capabilities, the lower options follow the access a user already has through their groups and folder privileges, and can only narrow it.
- The top "Manage all…" option is different: it lifts the user above those privileges and gives them admin-level control of that area, adding the matching section to their Admin menu.
- Options with Org in their name work with organizations. They keep the user within their own organization. See Groups & Organizations: Setup Guide.
Application Resources (shared brand assets such as logos, backgrounds and thumbnails)
- Read App Resources: can only view these resources, never edit them, even where their privileges would normally allow it.
- Read and manage App Resources (member default): view and manage application resources according to their existing group and folder privileges.
- Manage all App Resources: full control of application resources regardless of privileges, and adds a Content management section to their Admin menu.
My Files (the user's personal file area, and the features that rely on it)
- No access to My Files: removes the My Files tab. Because Presentations rely on My Files, the user can no longer create presentations and existing ones become unavailable.
- Read My Files: keeps the My Files tab but read-only. They can open what is there, including files an admin placed for them, but cannot add or change anything, and cannot create new presentations.
- Use My Files (member default): the normal experience. They can add, edit and organize their own files and create presentations.
- Manage My Files: Ability to manage other users My Files.
(not available yet, coming soon)
Workspace Files (the content library)
- Read Workspace Files: they can only view workspace content. Any edit rights from their group or folder privileges are reduced to read-only.
- Read and manage Workspace Files (member default): exactly as today, based on their group and folder privileges. Editing still requires file edit mode to be on.
- Manage all Workspace Files: full admin-level control of all workspace content regardless of privileges, and adds a Content management section to their Admin menu.
Showell Courses (the LMS)
- Participate in Showell Courses (member default): they can take the courses assigned to them.
- Manage Showell Courses: makes them an LMS admin, adding a Courses section to their Admin menu where they can create and manage courses.
Shares (Digital Sales Room shares)
- No access to Shares: removes the Shares feature, including the Shares tab.
- Read accessible Shares: they can open shares they have access to, for example when someone adds them as a collaborator, but cannot create or edit any share. Handy when you want to build shares for your salespeople without letting them change them.
- Manage accessible Shares (member default): the normal experience. They can create shares and manage the ones they have access to.
- Manage accessible Shares and read all Shares: as above, plus they can see every share in the workspace, read-only for the ones they do not own.
(not available yet, coming soon) - Manage all Shares: full admin-level control of every share in the workspace.
(not available yet, coming soon)
Analytics
- Read own Analytics (member default): they see analytics for their own shares.
- Read Org Analytics: they see the analytics of their own organization, including its Share analytics. Users who are not in an organization are not included. This adds an Analytics section to their Admin menu.
- Read all Analytics: full analytics access across the workspace, and adds an Analytics section to their Admin menu.
Users (which users they can see, for example in the collaborator picker)
- View only yourself: they see only themselves and cannot add other people as collaborators. Use this today if you do not want users to see other users.
- View Org Users: they only see the users in their own organization.
- View Org Users and Users without an Org Group: they see their own organization, plus users who are not in any organization.
- View all Workspace Users (member default): they see everyone in the workspace.
Groups (which groups they can see)
- View own Groups: they see only the groups they belong to, for example with adding privileges to folders.
- View all Groups (member default): they can see all groups, but not who belongs to them.
- View all Groups and their Members: they can see all groups and their members. This needs Users set to "View all Workspace Users", and adds a Groups section to their Admin menu for viewing only; they cannot create groups or change membership.
Notifications
- See own Notifications (member default): they receive notifications but cannot send any.
- Notify Org Users: they can send notifications to the people in their own organization. This adds a Notifications section to their Admin menu.
- Notify anyone and see every Notification: full notification control. They can send notifications to anyone and see all notifications. This needs "View all Groups and their Members".
App Sign-In
- Allow app sign-in (member default): normal access.
- Do not allow app sign-in: blocks the user at the sign-in screen. Use it to suspend someone's access without deleting their account. The block takes effect the next time they refresh or sign in.
💡 FAQ
Can a user view or edit content without being made a full Admin?
Yes, in two ways: add them to a group that has view or edit privileges for the relevant folders, which is the usual way to control content access, or create a custom role that grants only the capabilities they need, such as managing Workspace Files or sending notifications. The three role types are explained under Roles in Showell above.
For how roles and privileges work together see:
Can I stop someone from signing in?
Yes. Set a custom role's App Sign-In capability to not allow sign-in, then assign that role. This blocks access without deleting the account.
Do custom roles work in the Windows, iOS and Android apps?
Yes. You create and assign roles in the Showell App for Web, and the permissions apply wherever the user signs in.
How do I keep a dealer’s users within their own organization?
Put each dealer in its own organization. Then give the dealer’s users a custom role with View Org Users, so they only see their own colleagues. For the dealer’s manager, add Read Org Analytics and Notify Org Users, so they can follow and inform their own team without seeing other dealers.
🔔 Troubleshooting
A role change isn't showing for the user?
- Roles apply in every Showell App. The Admin sections a role unlocks are only in the Showell App for Web.
- Ask the user to log out and log back in.
- If it still does not update, clear the browser cache or try a private/incognito window. Cached data can delay a role change. This usually resolves on its own, but clearing the cache refreshes it immediately.
I don't see Custom Roles, why?
The feature may need activating on your workspace, contact your CSM or Showell support.