Themes and Templates: Setup Guide
Showell themes are ready-made templates that are mobile-responsive. You can brand your main page or folders by customizing the different elements with your brand colors, images, videos, logos, and fonts.
Who is this for?
👤 Administrators
👁️🗨️ Available for all subscription plans
In this article
Step 1: Set your Theme Template
Step 2: Set a background, logo and title to your Template
Step 3: Create Buttons, that link to your folders or contents
Before you get started
1. If you want to create a personalized main page or folder, it's important to customize it according to your company's branding. To do this, we recommend uploading your personalized content to your Application resources before you start. This ensures that your customized content is readily available and can be easily incorporated into your main page or folder.
2. Additionally, it is important to note that any changes made to the main page will immediately be visible in the Showell App. If you are uncertain about the changes or do not want to impact your users during the editing process, you can, specifically for testing purposes, create and make changes to a private folder before making modifications to the main page itself. Unsure? Contact us for guidance.
3. When you make changes to your main page or folder in Showell Admin, The Showell Admin 'Template-view' will not appear exactly the same as in the Showell App. To get a real-time view of the changes, it's recommended to keep the Showell App for Web open while making modifications. To see the changes you've made reflected immediately, simply refresh the Showell App for Web browser tab. This allows you to ensure that the changes match your desired outcome and make any necessary adjustments.
Keep reading to discover how you can completely transform your Showell Workspace!

Step 1: Set your Theme Template

- In Showell Admin, Choose the place you'd like to set a Template
- Main Page (your Workspace home page): Click Files from the top menu bar > Click Main page
- Any folder of choice: Click Files from the top menu bar > Navigate to the desired folder
- In the top right, click on Theme and Select template
- Choose one of the 9 available templates. If you have a specific template idea that cannot be created using the default available options, we offer custom solutions. You can contact us for a quote to discuss your requirements and our team will work with you to create a personalized template that meets your needs.
Step 2: Set a background, logo and title to your Template

1. Background
There are two different methods to add a background to your Template, and it's important to understand how each option works before making a selection. This will allow you to choose the best background option that aligns with your desired outcome.
Option 1A - Set a general background
- By selecting this option, if you are setting up the Main Page, you set a default background for the entire Workspace. If you are setting up a top-level folder, the background will reflect to only its subfolders. Keep in mind that you can still customize the background for each subfolder individually within their settings.
- It is important to note that when choosing this option, you should use only images and not videos.
- Achieve this the following way: Click in the top right on Theme > Select background, and choose your background image. You will be able to choose from a wide variety of standard backgrounds, but also see the images you have uploaded to the background folder within your Application resources.
Option 1B - Set a 'template-only' background
- Choose this option if you want to set a background specifically for your main page or the folder where you're adding a template. This way, you can customize the appearance without impacting other folders or subfolders.
- With this option, you can set videos or images as a background. It is important to use videos in mp4 format for the best viewing experience across all platforms. Make sure to reduce the file size to ensure that your users can smoothly download the video on their devices, as this is important for the main page to function properly.
- Achieve this the following way: In the top left corner of your template, click Insert file (or if you have a background set already to the theme, click its name), and choose your image or video.
2. Logo
To set a logo, click on the "Insert Image" button (or the logo name, if you have one set already) located in the top right corner of your template. We recommend uploading your logos to a custom "logos" folder within your Application Resources. This makes it easier to add them to your templates in the future.
3. Title
Certain templates offer the option to include a title or slogan. You can easily add it in the designated area of the template or leave it blank if you prefer not to have a title.
Step 3: Create Buttons, that link to your folders or contents
Create Buttons
Once you have customized your template to make it visually appealing, the next step is to add buttons. These buttons will serve as links to your top-level folders, sub-folders, or content, allowing users to easily navigate through your Showell Workspace.
- Click Insert file on the bottom of your template or click the 'files-area' > choose insert in the top left

- Browse to the folders you would like to add. you can select one or multiple at the time using the check marks. Click OK when ready.
- To position your buttons in the desired location, simply click and hold the button, then drag it to the correct spot on the template.
Set Button Thumbnails
To add an extra level of personalization, you have the option to customize the thumbnails for your buttons. This allows you to choose images or icons that you as a company identify with. We recommend having thumbnails of 500x500 pixels.
- In the Template, Click on the name of the added content to open its options menu.
- From there, you can choose to upload a thumbnail or select one from the gallery. The gallery offers a wide variety of thumbnails to choose from, including any images you have uploaded to the thumbnail folder in your Application resources.
- Thumbnails in your Showell Workspace can have any shape, color, transparency, or solidness. You have the flexibility to include images or icons that help users easily locate the relevant content they are looking for.
- Once you have chosen your thumbnail, you can choose to crop the image by clicking on the link name > Crop image. you can also zoom in/out by using your mouse scroll.
💡 FAQ
Can Showell develop a Template/User Interface for us?
Yes, Showell can create a fully customized template for you, tailored to meet your specific requirements and preferences. Our team of experts will work closely with you to understand your needs and design a personalized user interface that aligns with your brand identity and objectives. Whether you have specific branding guidelines, color schemes, fonts, or any other design elements in mind, we can incorporate them into your customized template. Contact us for more information!
How can I enable Showell Themes and Templates on my Showell Workspace?
Showell Themes is a Showell Add-on, that is included with the Professional Plan. If you'd like to know more:
Is it possible to use our company font on the Templates?
Absolutely! You have the flexibility to upload and utilize your own fonts. To accomplish this, you must access the config.json file located within your Application Resources, and upload your fonts to a Fonts-folder. Click here for more information and step-by-step guidance.
Is it possible to change the name of a button or the folder it is linked to?
Certainly, there are various approaches you can take depending on your desired outcome.
A. Change the name of the Button, and also for the folder it links to:
- Rename the folder: Navigate to the folder > open its settings > 'enter a new name' and 'save'.
-
Remove the link: On the Template, click the link name > Remove link
-
Add the renamed folder: as explained above
B. Change the name of a button, but not the folder it links to:
- On the Template, click the link name > Link settings > 'enter a new name' and 'save'.
C. Change the folder name, but keep the button name as it is:
- Navigate to the folder > open its settings > 'enter a new name' and 'save'.
🔔 Troubleshooting
Can I undo a mistake I made while working on my template?
To undo a mistake while working on your template, simply click the 'Undo' button located at the top right corner of the page. It's important to note that once you refresh or navigate away from the page, this option will no longer be available.

Why is my background not displayed correctly?
The display size and aspect ratio of your and your users' devices can have a significant impact on how the background is displayed.
When choosing a background image for your Showell Theme, it is recommended to use PNG or JPG file types. The long side of the background image should have a minimum of 2048 pixels.
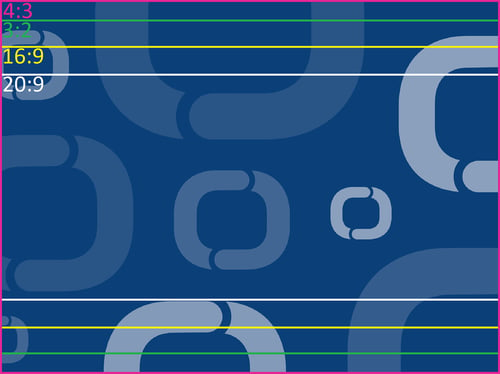
It's important to keep the subject of the image centered because the background image sides might get cropped depending on the device being used. For example:
- iPads have a 4:3 ratio with dimensions of 2048 x 1536 pixels
- Laptops and monitors have varying aspect ratios depending on the Showell window size chosen by the user
- Phones can have ratios between 16:9 and 20:9 with dimensions of 2048 x 1152/922 pixels.
